Form Validation Widget
Add real-time email validation to any web form with a single line of code. The Truelist form validation widget automatically validates email addresses as your visitors fill out your forms, blocking invalid emails before they enter your system.
No JavaScript knowledge is required. Just paste a script tag and you’re done.
Quick start
1. Set up form validation in the dashboard
Go to Form Validation in your Truelist dashboard settings, and click Set up form validation. Enter a name and add the domain(s) where you’ll use it.
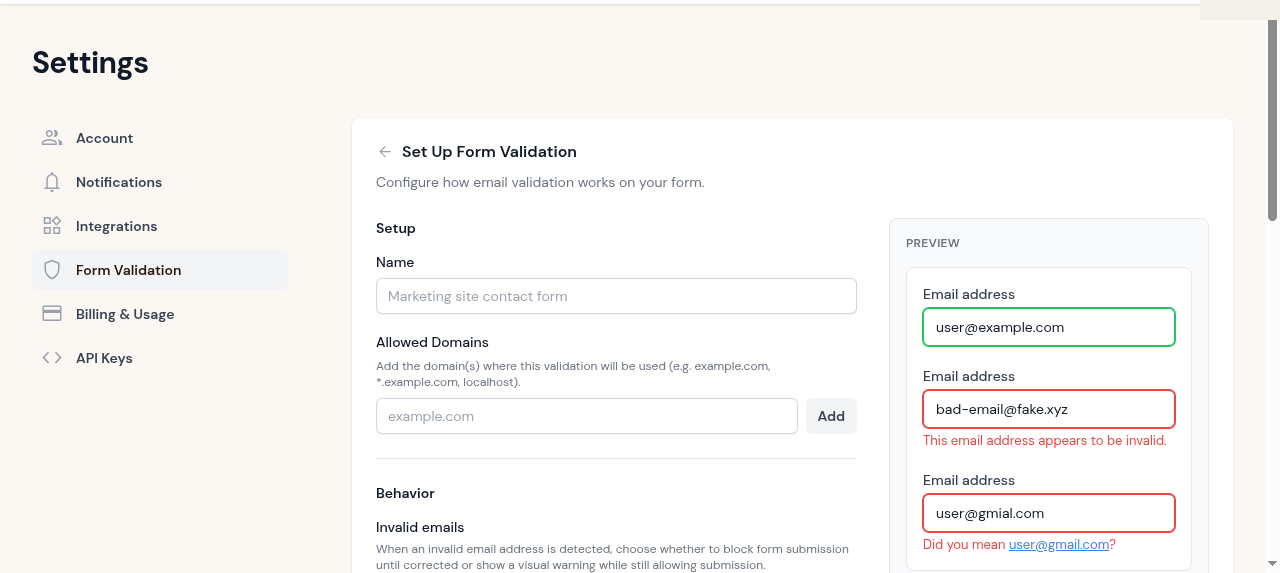
2. Configure behavior
Choose how the widget should handle invalid emails:
- Block submission (default) – prevents the form from being submitted until the email is corrected
- Warn only – shows a visual warning but allows submission
You can also configure how risky emails (accept-all domains) are handled, customize error messages, and more. The live preview on the right updates as you change settings.
3. Copy the embed code
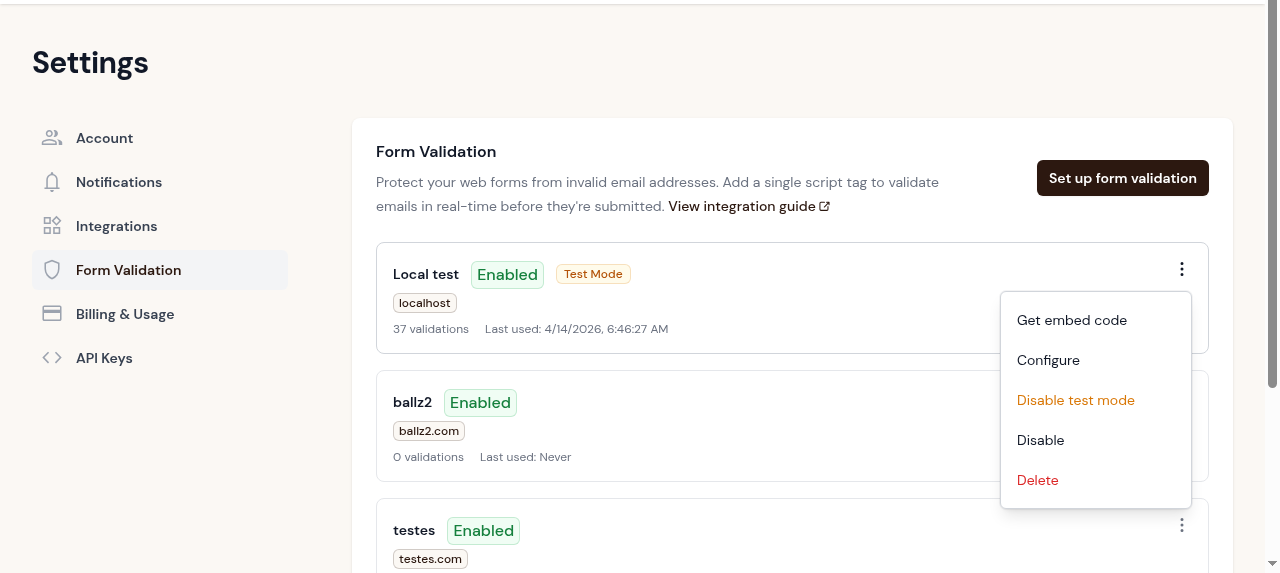
After saving your configuration, click the three-dot menu on your form validation key and select Get embed code. Copy the generated script tag.
4. Paste it on your site
Add the script tag before the closing </body> tag on any page with a form:
<script src="https://files.truelist.io/sdk/v1/truelist-form.js"
  data-key="fk_your_key_here"></script>
That’s it. The widget will automatically find all <input type="email"> fields on the page and start validating them.
How it works
When a visitor fills out your form, the widget:
- Detects when the user finishes typing their email (on blur, by default)
- Sends the email to the Truelist validation API
- Shows instant visual feedback on the email input
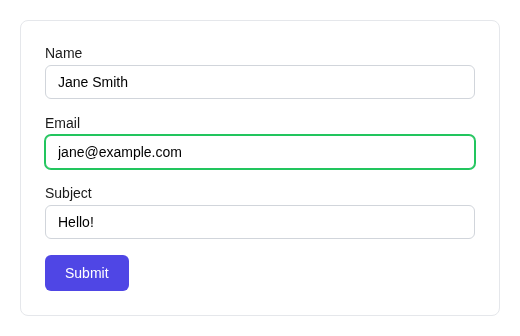
Valid email
When the email is verified as valid, the input gets a green border:
Invalid email
When the email is invalid, the input gets a red border and an error message appears:
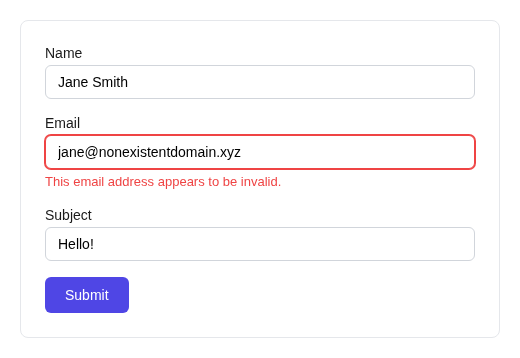
In block mode, the form cannot be submitted until the email is corrected.
Typo suggestion
When Truelist detects a likely typo (like gmial.com instead of gmail.com), it shows a clickable suggestion:
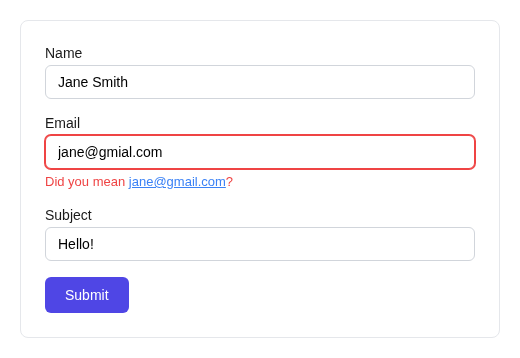
Clicking the suggestion automatically corrects the email and re-validates it.
Embed code format
The widget is configured via a data-config attribute containing a JSON object. The Truelist dashboard generates this for you, but here’s the full format:
<script src="https://files.truelist.io/sdk/v1/truelist-form.js"
  data-key="fk_your_key_here"
  data-config='{"mode":"block","risky":"allow"}'></script>
If you only include data-key, the widget uses sensible defaults (block mode, default messages, default styles).
Configuration options
All options are set through the dashboard’s widget builder. For reference, these are the available configuration options:
| Option | Default | Description |
|---|---|---|
mode | block | block prevents submission for invalid emails. warn shows feedback only. |
risky | allow | How to handle risky/accept-all addresses: allow, warn, or block. |
validateOn | blur | When to validate: blur (on field exit), input (as user types), or both. |
debounce | 500 | Delay in ms before validating when using input mode. |
selector | input[type="email"] | CSS selector for the email input(s) to validate. |
noStyles | false | Set to true to disable default styles and provide your own CSS. |
errorMessage | “This email address appears to be invalid.” | Message shown for invalid emails. |
riskyMessage | (none) | Message shown for risky emails (only used when risky is warn or block). |
suggestionMessage | “Did you mean …?” | Template for typo suggestions. Use the placeholder to insert the corrected email. |
loadingText | (none) | Text shown while validation is in progress. |
Platform guides
The widget works with any website or form builder. Here’s how to add it on common platforms:
Plain HTML
Add the script tag before the closing </body> tag:
<!DOCTYPE html>
<html>
<body>
  <form action="/submit" method="POST">
    <input type="email" name="email" placeholder="your@email.com">
    <button type="submit">Subscribe</button>
  </form>

  <script src="https://files.truelist.io/sdk/v1/truelist-form.js"
    data-key="fk_your_key_here"></script>
</body>
</html>
WordPress
- Go to Appearance > Theme File Editor (or use a plugin like “Insert Headers and Footers”)
- Add the script tag to your theme’s
footer.phpbefore</body>, or use the plugin’s “Scripts in Footer” field - Make sure the domain in your Truelist form validation settings matches your WordPress site domain
Webflow
- Go to Project Settings > Custom Code
- Paste the script tag in the Footer Code section
- Publish your site
Squarespace
- Go to Settings > Advanced > Code Injection
- Paste the script tag in the Footer field
- Save
Shopify
- Go to Online Store > Themes > Edit Code
- Open
theme.liquid - Paste the script tag before the closing
</body>tag - Save
React / Next.js
Add the script tag to your layout or use a useEffect hook:
import { useEffect } from 'react';

export default function ContactForm() {
  useEffect(() => {
    const script = document.createElement('script');
    script.src = 'https://files.truelist.io/sdk/v1/truelist-form.js';
    script.setAttribute('data-key', 'fk_your_key_here');
    document.body.appendChild(script);
    return () => script.remove();
  }, []);

  return (
    <form>
      <input type="email" name="email" placeholder="your@email.com" />
      <button type="submit">Subscribe</button>
    </form>
  );
}
Lovable
If you’re building with Lovable, add the script tag to your app’s index.html before the closing </body> tag. The widget works with any form Lovable generates – no extra configuration needed.
Custom CSS
By default, the widget injects a small stylesheet that adds colored borders and message text. If you want full control over the styling:
- In the dashboard, uncheck Use default styles in the Appearance section
- Add your own CSS targeting the
.truelist-*classes:
/* Input states */
.truelist-valid { border-color: #22c55e; }
.truelist-error { border-color: #ef4444; }
.truelist-risky { border-color: #f59e0b; }
.truelist-loading { border-color: #94a3b8; }

/* Validation messages */
.truelist-message { font-size: 13px; margin-top: 4px; }
.truelist-message--error { color: #ef4444; }
.truelist-message--risky { color: #f59e0b; }

/* Typo suggestion link */
.truelist-suggestion-link { color: #3b82f6; text-decoration: underline; }
Dynamic forms and SPAs
The widget includes a MutationObserver that automatically detects when new email inputs are added to the page after the initial load. This means it works with:
- Single-page applications (React, Vue, Svelte, etc.)
- Forms loaded via AJAX
- Multi-step forms where the email field appears later
- Modal/popup forms
No extra configuration is needed for dynamic forms.
Advanced: Programmatic API
For developers who need more control, the widget also exposes a programmatic JavaScript API. Omit the data-key attribute from the script tag and initialize manually:
const truelist = new TruelistForm({
  apiKey: 'fk_your_key_here',
  mode: 'block',
  riskyBehavior: 'allow',
  onValidation: function(result, input) {
    console.log('Validation result:', result);
  },
  onError: function(error, input) {
    console.log('Validation error:', error);
  }
});

// Attach to a specific input
truelist.attach('#email-input');

// Validate programmatically
truelist.validate('user@example.com').then(result => {
  console.log(result); // { result: 'valid' }
});
Test mode
While developing, enable test mode on your form validation key from the dashboard. Test mode bypasses rate limiting so you can validate as many emails as needed during development.
Remember to disable test mode before going to production.
Fail-open behavior
The widget is designed to never block legitimate users due to infrastructure issues:
- If the Truelist API is unreachable (network error), the form submits normally
- If the API returns a rate limit error (429), the form submits normally
- If validation takes longer than 10 seconds, the form submits normally
This ensures your forms always remain functional, even in edge cases.
Credit usage
Form validations use the same credit system as other Truelist validations. Credits are charged for definitive results (valid / invalid) but not for uncertain results (unknown).
Security
Form API keys are designed to be embedded in public HTML. They are protected by:
- Domain restrictions – keys only work from the domains you configure
- Per-IP rate limiting – each IP address is automatically limited to a small number of validations per day per key, preventing abuse
- HTTPS required – non-localhost requests must use HTTPS
Note
Troubleshooting
The widget isn’t showing validation results
- Check the browser console for errors
- Verify your form API key is correct and enabled
- Make sure the domain matches your key’s allowed domains list
- For local development, add
localhostto allowed domains and enable test mode
Form still submits with invalid emails
- Verify the widget is in block mode (not warn mode)
- Check that the email input has
type="email"or configure a customselector - Make sure the script tag loads before the form submission
CORS errors in the console
- The requesting domain must be in the key’s allowed domains list
- Non-localhost requests must use HTTPS
- Check that the
Originheader is being sent (it’s automatic in browsers)
Rate limiting (429 errors)
- Enable test mode during development to bypass rate limits
- In production, each IP is limited to a small number of validations per day per key – this is by design to prevent abuse
- If legitimate users are hitting limits, contact support